P.O.P OR PLASTERBOARD WHICH ONE IS THE BEST

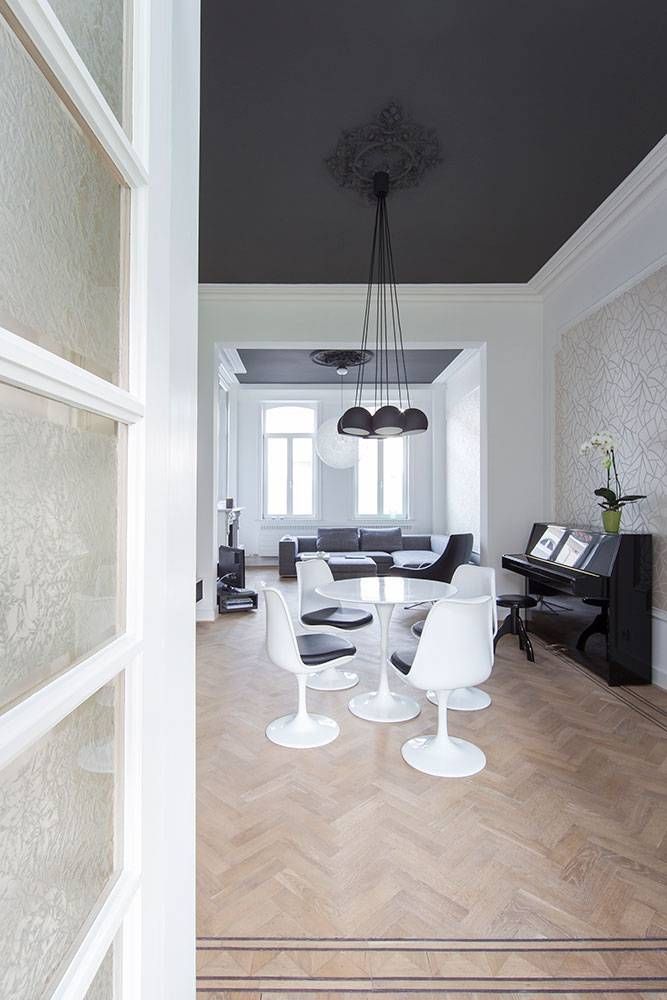
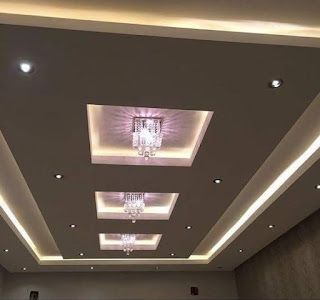
False ceilings have become an integral part of home construction adding beauty to the home along with keeping away excess heat, cold and noise from your abode. These are also essential for concealing electrical wires and installing a central air-conditioning system. However, a false ceiling can be durable only when a quality material is chosen. Click here ceiling designs for different types of false ceiling designs. Gypsum boards and Plaster of Paris (P.O.P) are two of the most commonly used materials for creating a false ceiling. While both have gypsum as a base, the two are different from each other. Here we list the pros and cons of these two false ceiling materials to help you make a guided choice.

Let’s first look at how they are used to make false ceilings

HOW P.O.P (PLASTER OF PARIS) AND PLASTER BOARD ( GYPSUM BOARD) ARE MADE TO FORM FALSE CEILINGS.

1. P.O.P false ceilings are made of P.O.P powder. The P.O.P powder is applied on chicken mesh that provides mechanical strength. The P.O.P powder is mixed with water on site and then applied on the mesh that is attached to local metal framing system; there is a high chance of wastage during this process. Once dried it creates a P.O.P false ceiling.

2.Plaster board false ceiling is made using gypsum plasterboard’s, fixed with screw to metal frame connected to soffit. The joints are finished using jointing compound. Installing gypsum plasterboard is a faster process.

THE PROS AND CONS OF POP AND PLASTER BOARD.

1. P.O.P
Pros

a) POP is highly durable and can sustain for years without any wear or tear.

b) Unlike gypsum boards, P.O.P can be moulded in various designs and is flexible to apply on the corners.

c) POP is also 20-40 per cent cheaper than gypsum boards.

Cons
a) Until and unless skilled labour is working on a P.O.P design, the finesses with which gypsum boards are manufactured cannot be achieved.

b) In case of P.O.P, there is a lot of wastage of mixture. It can make the site messy.

c) The P.O.P has to be perfectly dry for it to be installed

2. PLASTER BOARD
Pros:

a) Installing Gypsum false ceilings is easy, and the cleaning process is quite effortless as well.

b) The boards provide a seamless look, which means it is attached to your ceiling without too many joints

c) Since they are factory produced, the quality and consistency of the products’ finish is maintained

Cons:

a) Even though a gypsum false ceiling is quite easy to install, the whole uninstallation process can be quite tedious. If you ever have to repair the ceiling, it would mean breaking the whole thing down.

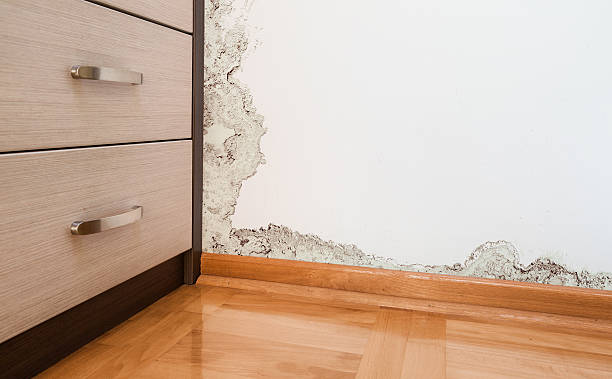
b) It’s just a matter of time before moisture seeps into the false ceiling, it can be through leaky roofs or air conditioning pipes. This can lead to fungal growth or cause the ceilings to lose their shape. To avoid this inconvenience, it’s best if you opt for moisture-resistant boards.

c) Gypsum boards cost more than P.O.P

d) As time goes on, a gypsum false ceiling may show signs of cracks around the joints. These cracks may appear due to slight movements in the false ceilings that are caused due to ceiling repair, cutting holes for light and fan fixtures, or in places where the ceiling meets the attached walls.

We hope with the above information you can make a decision on the material to use for your false ceilings.

You can contact us through our Whatsapp button or Get a Quote button if you need a professional to do your false ceiling.

The Benefits of Paint Primer

Primer is a bond, designed to seal and protect the surface and to provide a consistent base for topcoats of paint. Priming walls may seem like an extra step or extra cost in the painting process, but the benefits far outweigh the extra work or cost. Think of paint primer as a base coat that creates the foundation for a flawless paint job. From cutting down the number of coats you’ll need, to protecting your paint from wear over the years, priming actually makes your job easier in the long run. And no matter what your skill level, using a wall primer will help you achieve a professional-looking finish.

White Primer, Transparent Primer, & Grey Primer.

Primer can be tinted but the popular and recommended colors are white, transparent, and grey.  Whichever colour you choose, you’ve to get the perfect base to get you started. Professionally we recommend using White and Transparent Primer for soft colours and neutral tones, and Grey Primer for deeper and darker shades of colors.

What Does Paint Primer Do?

1.Covers imperfections such as areas of your wall that may have been patched or repaired.

2. Blocks and conceals stains so they don’t bleed through your newly painted finish.

3. Provides a uniform surface for your paint to stick to. In order words it provides a chemical and physical bond between the base surface and topcoat which result to better adhesion and a longer-lasting paint job.

4. Creates a uniform base for a smooth, seamless paint application, so you can get the job done in fewer coats.

5. Neutralizes the color of your surface so when new paint is applied, the truest, most brilliant, color shines through.

When to use a primer before painting?

1. On surfaces that have never been painted before – the paint will soak into some materials, so start with a primer to use less of the colour topcoat.

2. Switching from a dark color to a lighter one.

3. If your wall has stains that you want to block (like water spots from a bathroom leak or smoke damage from a fire in a kitchen). A primer will reduce the blemishes before you apply your topcoat.

4. If you’re painting a humid area like a bathroom, which is more susceptible to mildew and leaching.

5. New or resinous wood should always be primed, for best results apply two coats.

6. On metal, a primer will help protect against rust and act as a strong foundation for subsequent coats of paint.

7. If you are painting a surface that has been skim with home charm, and you are using a Semi-Gloss paint or gloss paint. Primer will bind the paint to the surface which will prevent it from peeling.

How Many Coats of Primer Do I Need?


How much primer you need will depend on the condition of the wall or the surface of the object.  If your wall or surface of the object is in good condition, and you’re not changing finishes or making a drastic color change, one coat should do the trick. Use two coats for best results if you’re painting over a darker color, a glossier paint finish, or a porous surface.

Need help figuring out how much Primer you need? Check out on “Get a quote” section on our website.

HOW TO CHOOSE INTERIOR COLORS

Color can quickly transform a plain room into a striking space, but selecting the right color is often a challenge.   Interior color choices are highly subjective, which means there’s no right or wrong way to select a color for your space. You don’t necessarily have to follow theories of designs or the color wheel to create a successful combination. The most important consideration is finding a color that feels right to you.

The following tips on how to choose a color will help you fill rooms with shades that beautifully reflect your personal style;

WANT A CALM LOOK:

creams-and-pinks-1

You can choose to stay within the same shade and use a monochromatic approach such as select a variety of shades of blue for subtle color that tends to be soothing. This tends to look good in a bathroom or a bedroom if you want the feeling of calmness. You can also choose your favorite color and overlap the shades. For example, select a darker color for a part of wall and then another in the same color scheme but different shade and slightly lighter for the other part of the wall.

I WANT AN ELEGANT LOOK:

ceiling-wall-paint-colors-8

Neutral colors offer elegance and flexibility within a room. Neutral colors are no longer simply white or beige. You can turn a simple living room into one of elegance by selecting varying shades of neutral colors such as almond walls with red toned browns on the trim. You can also add splashes of color throughout the room with a color throw, pillow or vase carefully placed to offset the subtle neutral tones in the room. Again, don’t be afraid to add texture to your accessories. Neutral colors allow you more flexibility in quickly changing the feel to a room. You can easily change the feel of a neutral room by adding different colored accessories or painting the trim a new color. You can choose either lighter or deeper neutral colors and vary the look of the room. Remember, the lighter color you go, the more spacious the room will appear. Varying shades of rust, mahogany or garnet will offer instant elegance and a feeling of earthiness and richness.

I WANT A VIBRANT LOOK:

c527bf739e4a2f3f9caac6375ab47fab--purple-rooms-purple-walls

edf5018440c56e811da9f5689f4ac287

If you want a room with pizzazz, choose vibrant colors and their respective shades such as oranges and gold, reds and dark purples. You can complement these colors by selecting a two next to each other such as gold and orange and one from the opposite side of the color wheel such as purple. You can also select black and red for a real stand out contrast and look that is reminiscent of an Oriental look. Choose two colors next to each other on the color wheel for a visual contrast as one will stand out from the other.

Ceilings:

d042a3df5674bbfd2663aa331fdecbe3--colored-ceiling-dark-ceiling

You can lower a high ceiling visually by painting it a darker shade than the walls. By the same token, you can expand a room by selecting a lighter color for your ceiling than the walls. Don’t be afraid to add a tint of color to your ceiling paint for a tied in and subtle look. One way to go if you are afraid of too much color in your ceiling is to paint the ceiling, door trim and floor moldings the same shade such as a creamy ivory. This will add a touch of elegance and a nice transition throughout your room.

You can follow these tips to choose your interior colors.

CAUSES, AND TREATMENTS OF WALL DAMPNESS IN GHANA

We will be talking about the meaning of wall dampness, causes, and treatment respectively. First let’s look at the meaning of wall dampness.

Wikipedia defines Wall dampness or Structural dampness as ” the presence of unwanted moisture in the structure of a building, either the result of intrusion from outside or condensation from within the structure””. A high proportion of damp problems in buildings are caused by ambient climate dependent factors of condensation and rain penetration.

Damp walls in and around the house are a big problem facing homeowners in Ghana. Damp patches on the internal walls of your home can be a real pain as they are not only visually unappealing to look at but also the moisture and dampness on walls can cause mould.This dampness not only affects the life of the building but also creates unhygienic conditions of the important items of work in the construction of a building.

It is important to find the source of the problem and treat it as soon as possible. There are many different types of damp that can be found on walls, meaning the way to treat a particular damp problem differs too

Dampness may be caused by:

(a) Ground water

(b) Rain water and

(c) Leakages from pipes.

(a) Dampness due to Ground Water: All buildings are founded on soils. Soil holds water for a long time. Sometimes l level may rise and come in contact with foundation. Due to capillary action moisture from ground rises into foundation, floor and even in wall.

(b)  Rain Water: May enter the building components due to various reasons.

(i) From wall top: If top of wall is not protected with impervious course like concrete, water can enter the wall and keep it damp for a long time.

(ii) From face of external walls: Splashing of outer wall by rain results into moisture entering the wall. Poor plaster coat is the main source of this type of dampness.

(iii) Improper fixing of downtake pipes: If downtake pipes from roof are not properly fixed, a thin layer of water stagnates near the mouth of downtake pipes. This results into entry of rain water into roof and wall.

(iv) Improper slopes to roof: In flat roofs, many times this is the cause for the dampness of roofs. If slope is not given properly, water ponds are formed on the flat roof, which results into entry of water into slab. Once water enters the slab it remains for long time creating dampness.

(v) Defective construction: Imperfect wall joints, improper slopes to chejja, construction joints in roof etc. cause dampness in buildings.

(c)  Leakage From Pipes: From over head tanks, pipes are taken over roof and along the wall.

From bathrooms, toilets and kitchen water is drained out with different types of pipes. The pipes are joined to get required length and turns. Many times water leaks through joints resulting into moisture in building components.

The various defects caused by dampness to building can be summarized as under:

1. Efflorescence which may ultimately result in disintegration of bricks, stones, tiles etc.

2. Softening and crumbling of plaster.

3. Bleaching and flaking of paint with the formation of coloured patches.

4. Warping, buckling and rotting of timber.

5. Corrosion of metals.

6. Cause deterioration to electrical fittings.

7. Promotes growth of termites.

8. Creates unhealthy living conditions for the occupants.

The treatment given to keep the walls, floors and basement dry is termed as damp proofing whereas the treatment given to prevent leakage of water from roof is generally termed as water proofing. We will be talking about roof leakage in our upcoming articles, but our next article dampness will be talking about the treatment of wall dampness.


Design a site like this with WordPress.com
Get started